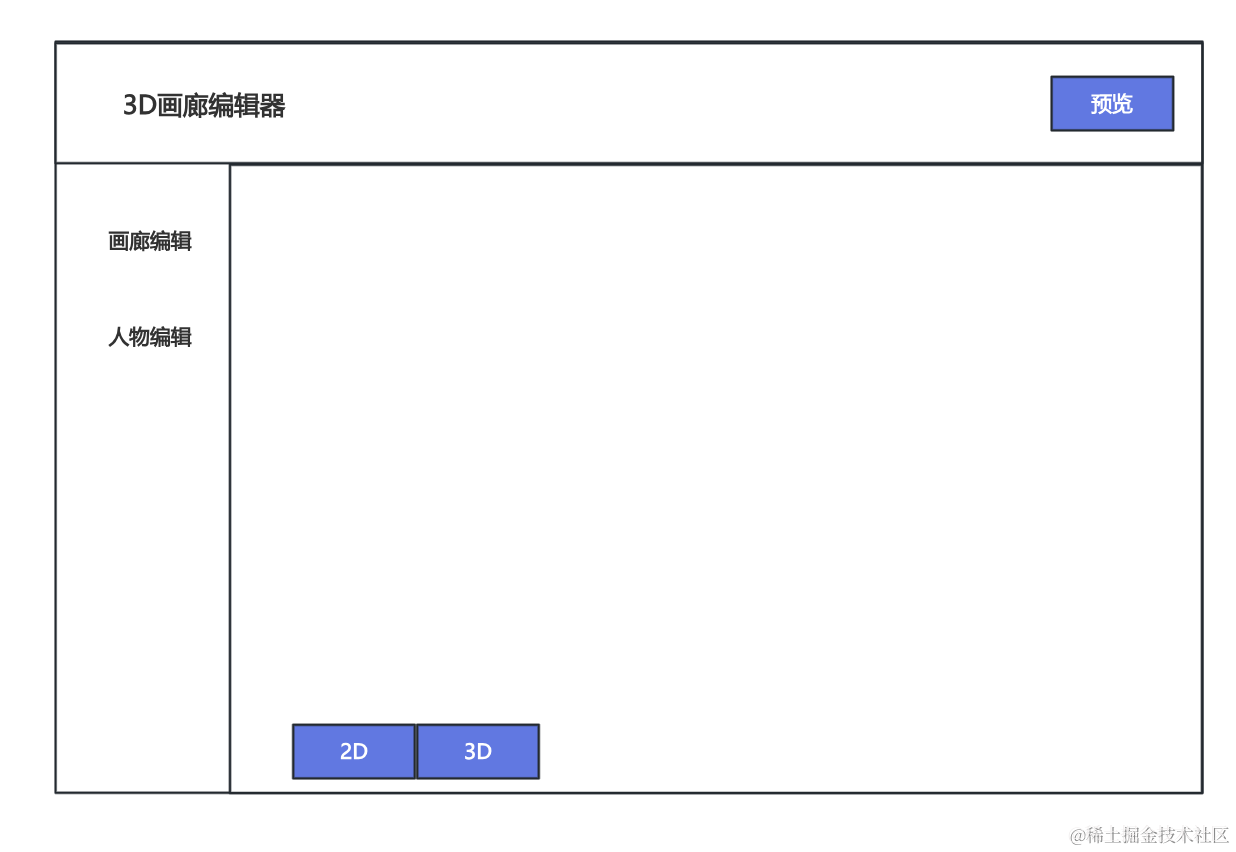
这节我们把基本的布局完成一下。
按照这个原型图:
首先改下 Header 部分:
src/components/Header.tsx
import { Button } from 'antd'

function Header() {
  return (
    <div className="header-content">
      <h1 className="header-title">3D画廊编辑器</h1>
      <Button type="primary">预览</Button>
    </div>
  )
}

export default Header
左边是标题,右边是预览按钮。
还有 Sider 部分:
src/components/Menu.tsx
import { Menu } from 'antd'

const menuItems = [
  { key: 'gallery', label: '画廊编辑' },
  { key: 'character', label: '人物编辑' },
]

function AppSider() {
  return (
    <Menu
      mode="inline"
      defaultSelectedKeys={['gallery']}
      items={menuItems}
      style={{ height: '100%', borderRight: 0 }}
    />
  )
}

export default AppSider
有两个菜单。
然后 2D、3D 的切换按钮可以用 antd 的 Segmented 组件来做:
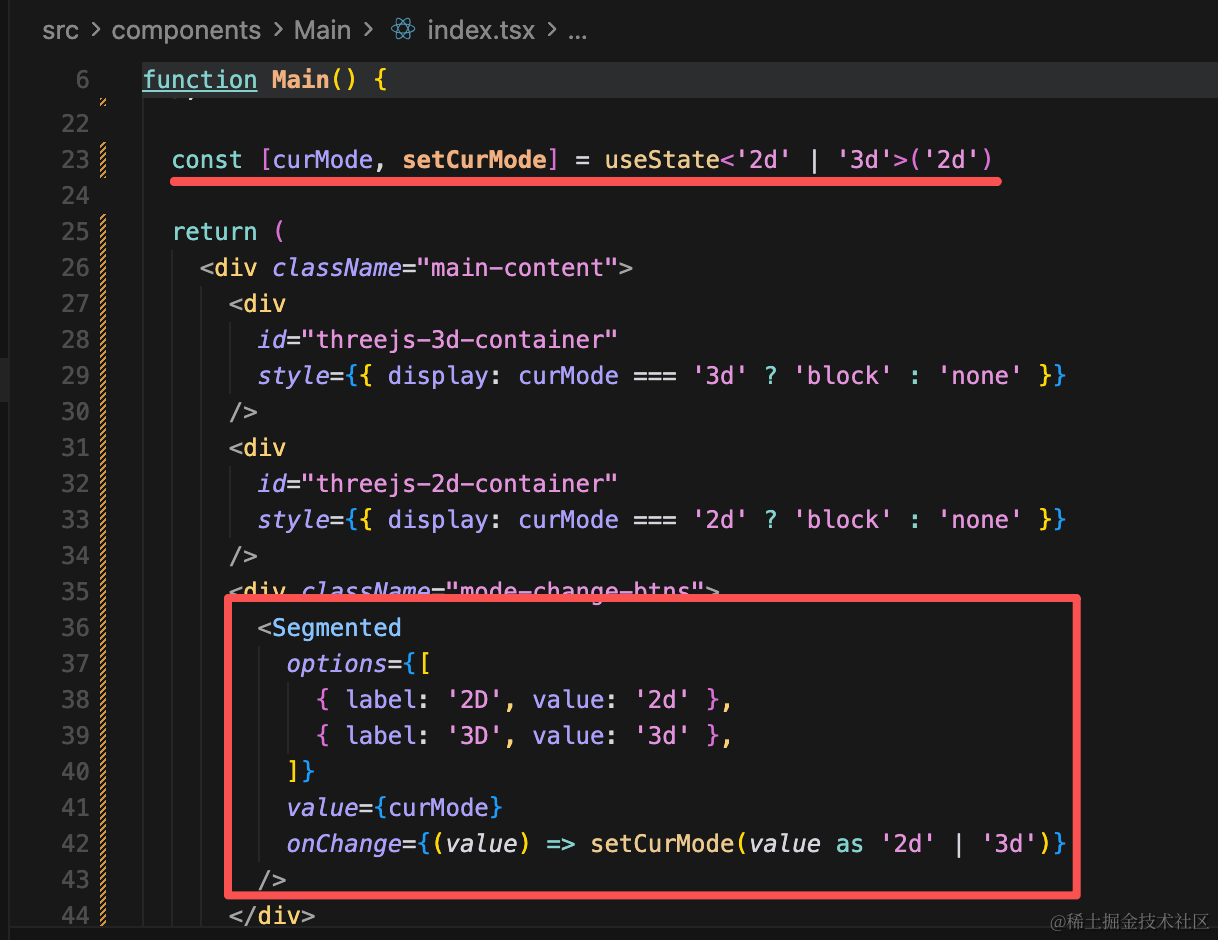
import { useEffect, useState } from 'react'
import { Segmented } from 'antd'
import { init3D } from './init-3d'
import { init2D } from './init-2d'

function Main() {
  useEffect(() => {
    const dom = document.getElementById('threejs-3d-container')!
    init3D(dom)
    return () => {
      dom.innerHTML = ''
    }
  }, [])

  useEffect(() => {
    const dom = document.getElementById('threejs-2d-container')!
    init2D(dom)
    return () => {
      dom.innerHTML = ''
    }
  }, [])

  const [curMode, setCurMode] = useState<'2d' | '3d'>('2d')

  return (
    <div className="main-content">
      <div
        id="threejs-3d-container"
        style={{ display: curMode === '3d' ? 'block' : 'none' }}
      />
      <div
        id="threejs-2d-container"
        style={{ display: curMode === '2d' ? 'block' : 'none' }}
      />
      <div className="mode-change-btns">
        <Segmented
          options={[
            { label: '2D', value: '2d' },
            { label: '3D', value: '3d' },
          ]}
          value={curMode}
          onChange={(value) => setCurMode(value as '2d' | '3d')}
        />
      </div>
    </div>
  )
}

export default Main
在 App.tsx 里引入下这些组件:
import { Layout } from 'antd'
import './App.scss'
import AppHeader from './components/Header'
import AppSider from './components/Menu'
import Main from './components/Main'

const { Header, Sider, Content } = Layout

function App() {
  return (
    <Layout className="gallery-editor-layout">
      <Header className="app-header">
        <AppHeader />
      </Header>
      <Layout>
        <Sider width={200} className="app-sider">
          <AppSider />
        </Sider>
        <Content className="app-content">
          <Main />
        </Content>
      </Layout>
    </Layout>
  )
}

export default App
最后改下样式 App.scss
body {
  margin: 0;
}

.gallery-editor-layout {
  min-height: 100vh;

  .app-header {
    display: flex;
    align-items: center;
    padding: 0 24px;
    background: #fff;
    border-bottom: 1px solid #000;

    .header-content {
      display: flex;
      align-items: center;
      justify-content: space-between;
      width: 100%;
    }

    .header-title {
      margin: 0;
      font-size: 18px;
      font-weight: 500;
    }
  }

  .app-sider {
    background: #fff;
    border-right: 1px solid #000;

    .ant-menu {
      margin-top: 16px;
    }
  }

  .app-content {
    position: relative;
    min-height: calc(100vh - 64px);
    background: #fff;
  }

  .main-content {
    position: relative;
    height: 100%;
    min-height: calc(100vh - 64px);

    #threejs-3d-container,
    #threejs-2d-container {
      position: absolute;
      top: 0;
      left: 0;
      right: 0;
      bottom: 0;
      width: 100%;
      height: 100%;
    }

    .mode-change-btns {
      position: absolute;
      z-index: 10;
      bottom: 20px;
      left: 20px;
    }
  }
}
看下效果:
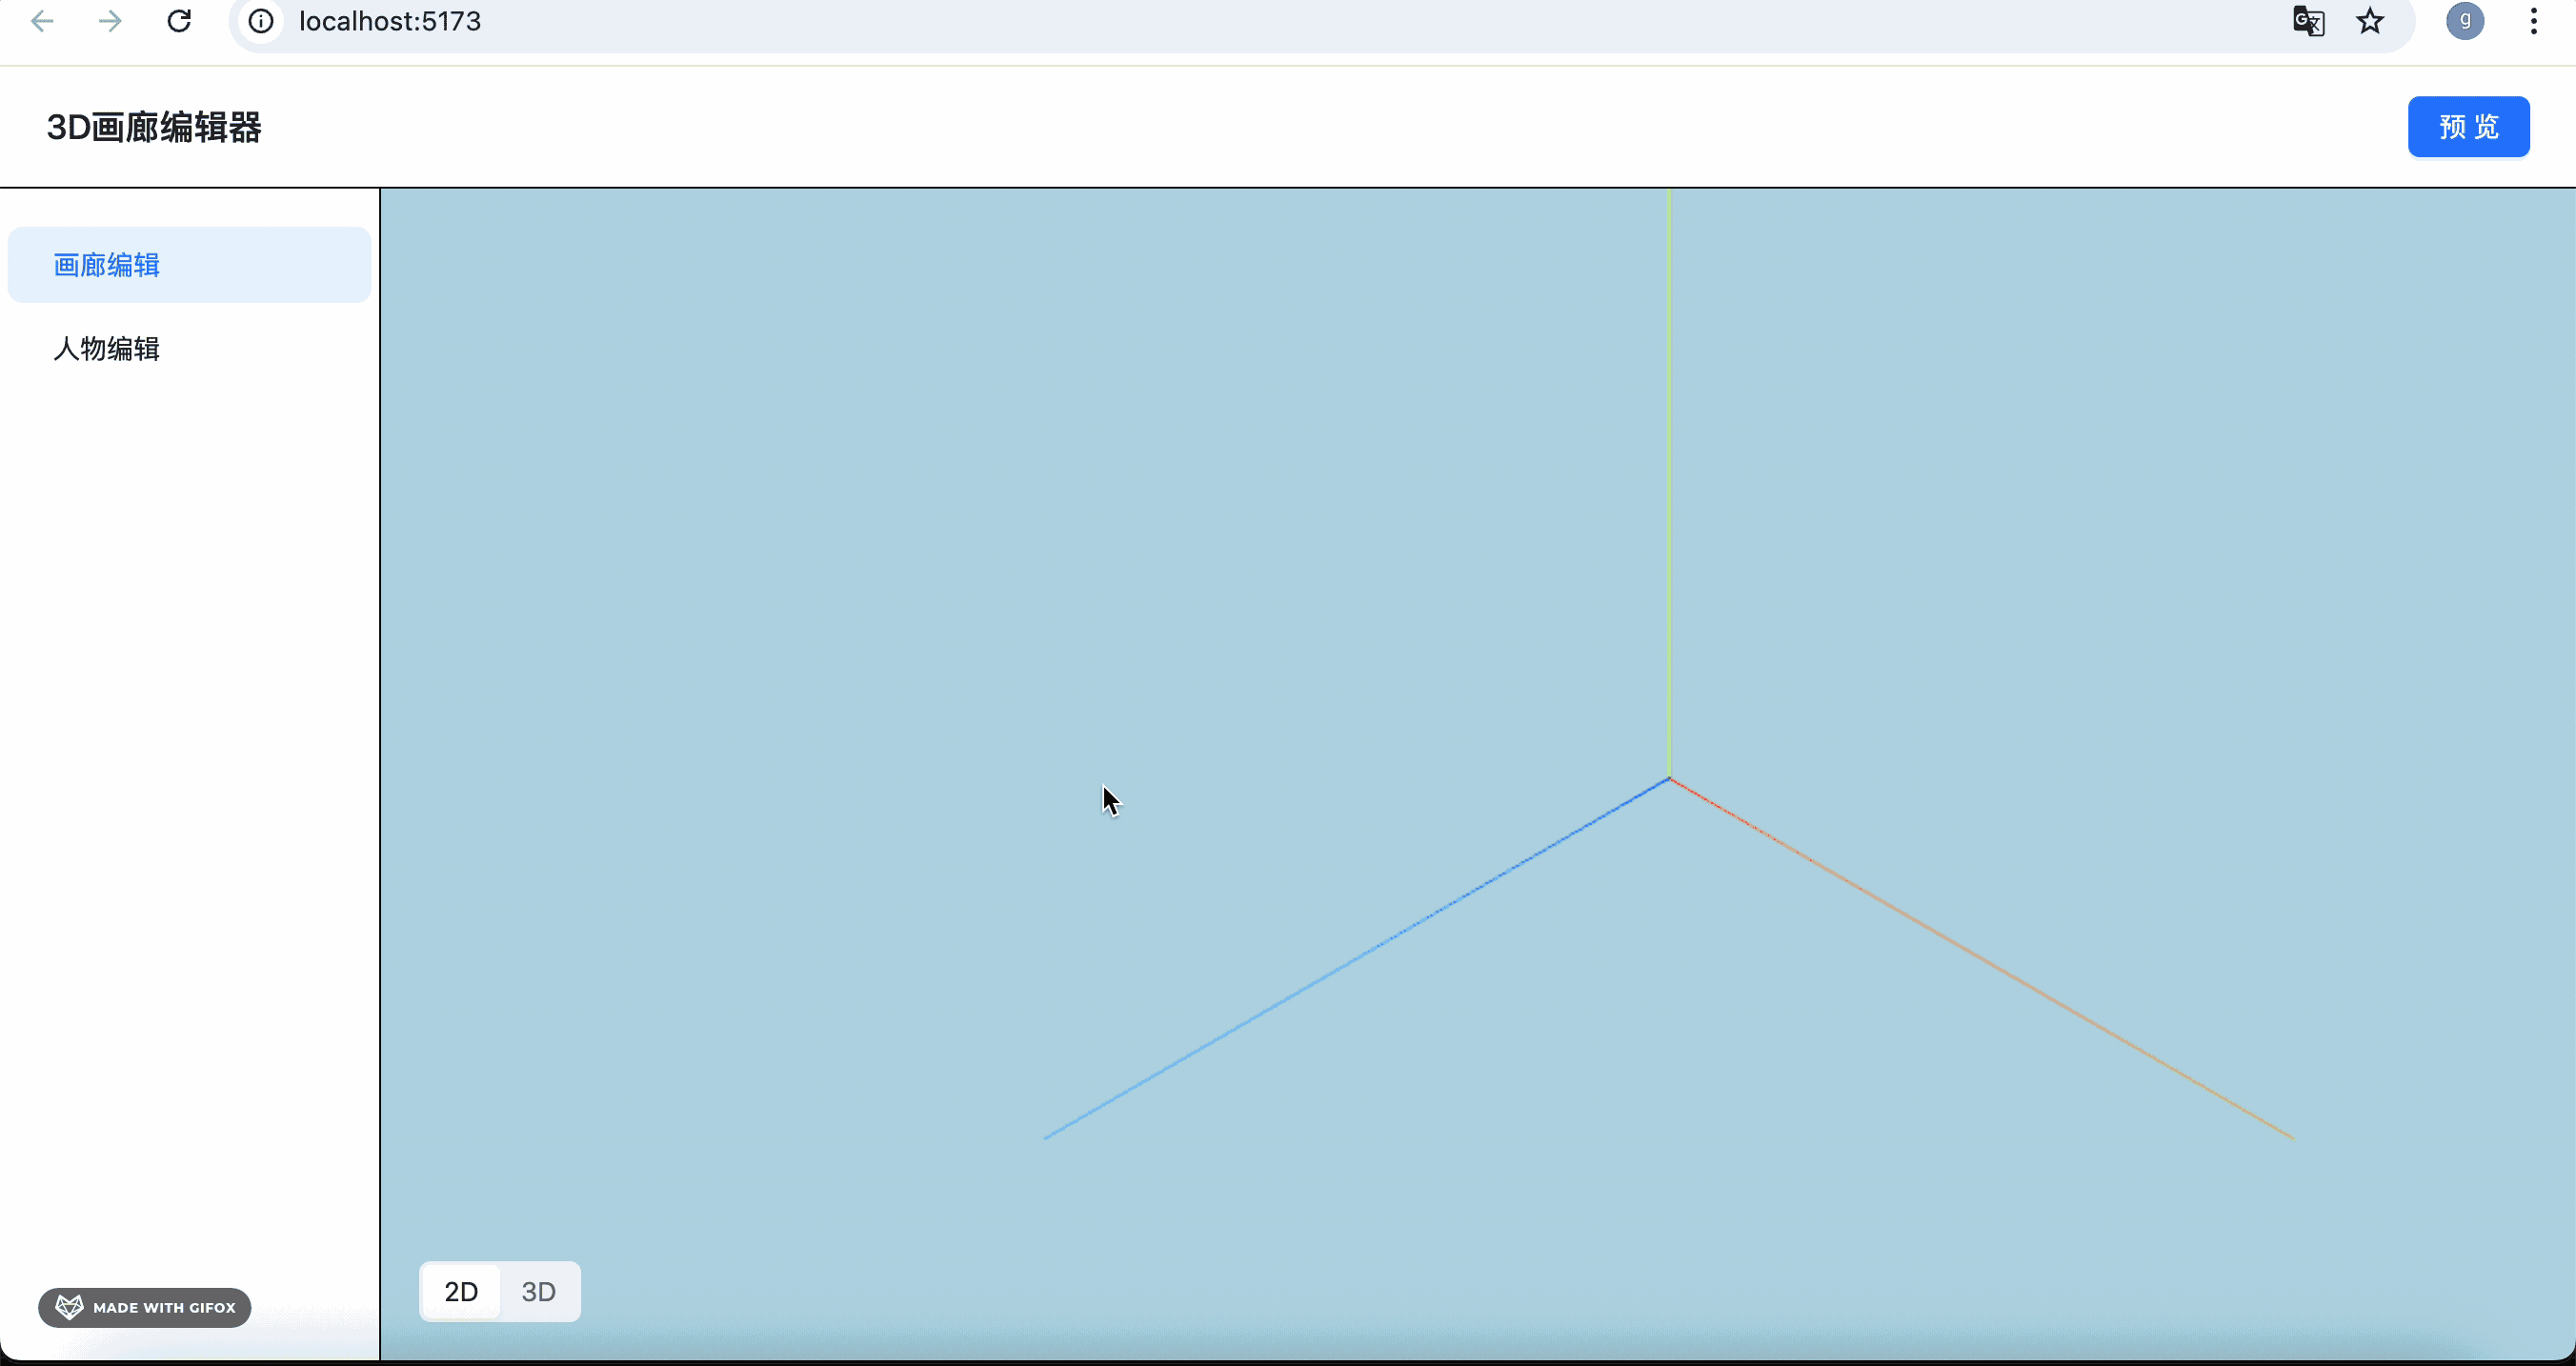
这样整体布局就完成了。
参考下原型图:
案例代码上传了小册仓库
总结
这节我们修改了下整体布局,下节来做人物编辑部分。